MORPHE | PRIDE COLLECTION | 25L PALLETE AND BRUSH SET | REVIEW
- Michelle
- Jul 1, 2019
- 12 min read
We all know, that June is the pride month and that there are so many brands coming up with beautiful collections to celebrate it. Morphe took it to the next level for me this year. Giving 100% of net proceeds from the pride collection to the Trevor Project charity? That's just incredible. I already liked the pallete and the brush set when I saw it for the first time, but this tripped me over and I just had to have it.
Just to give a little info about the Trevor Project, it's a U.S.-based nonprofit corporation, which provides 24/7 suicide prevention & crisis intervention services for LGBTQ+ youth. It's a beautiful collection with a beautiful cause supported by so many incredible artists and I was happy to contribute.
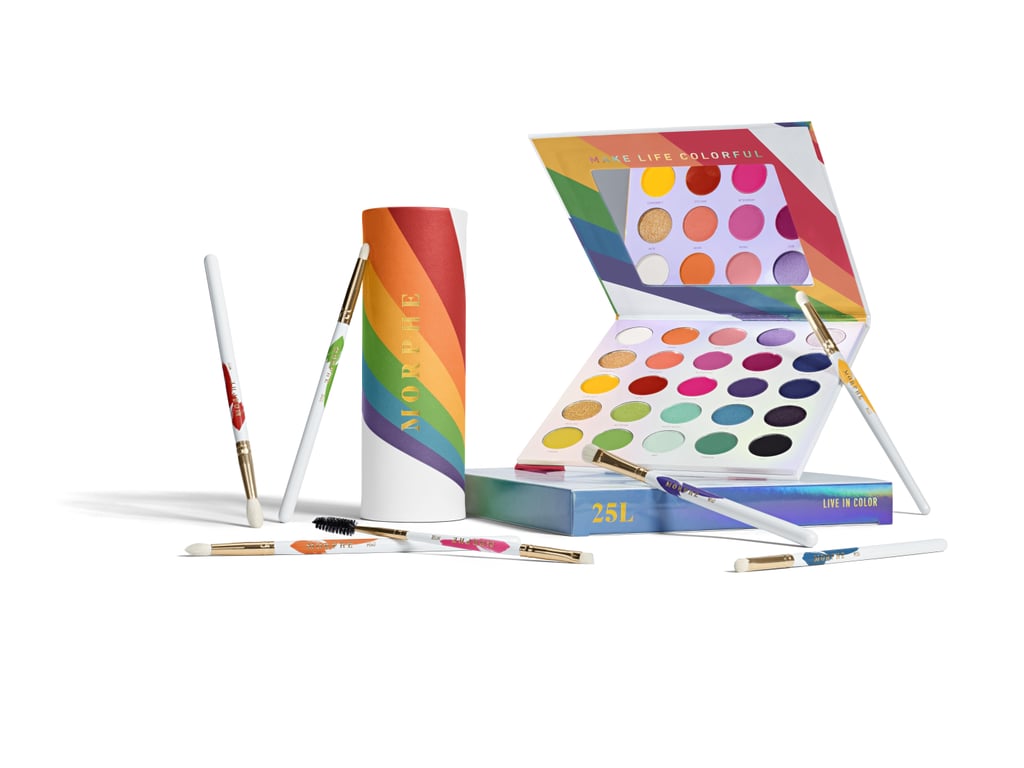
In the collection, we have an eyeshadow pallete and a brush set which come in a beautiful case. Both of the products are white with a rainbow stripe over them so it's very nice, very suiting, love it. Since I love every Morphe brush I own, and I don't have many of them, I decided to get both, the pallete and the brush set because I am a sucker for a good eyeshadow brushes and I also don't own a Morphe pallete yet, so this was such a good buy on so many levels.

LIVE IN COLOR BRUSH SET
First, let's talk about the brush set. Morphe brushes have become a big thing in the industry and among people everywhere around the world. They're affordable, they're good quality, they come in bundles and there are so many brushes to choose from. Morphe just does it right.
I own three of their brushes that I ordered from Beauty Bay back when they still sold Morphe. I have a tapered crease brush, tiny detail brush and a crease bullet brush. I'm not too sure about the names, but these brushes kicked up my blending game so much and I really love using them to this day. So I felt the great need to expand my collection of brushes and get this set as well.

The packaging is stunning, the brush case is this cylinder from a material that feels like faux leather. It's white with the rainbow wrapped around it and gold MORPHE logo on tha front. It closes with a magnet in the middle and has 7 brushes inside. To basicly when you open it you have s little paper stand for the brushes, which I believe I will somehow get rid of because I want all my brushes to fit that case. The only annoying thing about this packaging is that paper stands that hold the brushes flip out and just fall out on you randomly because they don't hold inside very well. That's good for me, because I want them out anyway. But if you want to keep it open on your vanity, it's a little tricky.
The seven brushes you get all have white handle and each of them has a different colored brush stroke with Morphe logo. The brushes are beautiful, I really appreciate that they made the whole set custom. They could've just put in the regular black brushes and call it a day, but this is something extra, that I really like.
I took this list from Morphe website to take a look at the brushes you get.
M513 Round Blender Brush (Natural): This full, fluffy blending brush buffs color into the crease for a diffused wash of color with no harsh lines.
M507 Pointed Mini Blender Brush (Natural): This slim brush tapers to a fine point for a light, wispy application of color. It can be used to blend out harsh edges or deposit small amounts of color in targeted areas.
M222 Round Crease Brush (Natural): Rounded brushes help you to perfect the windshield wiper motions and circular motions essential to perfect blending. This brush is a classic that everyone needs in their kit.
M431 Precision Pencil Crease Brush (Natural): Play a game of magic eye with this natural, pointed brush.
M326 Pro Precision Smudger Brush (Natural & Synthetic): A tiny, detailed brush that places color just where you want it. Perfect for smudging color along the lower lash line.
M167 Oval Shadow Brush (Natural): This flat, oval shader brush has natural bristles to grab your powder shadows and just enough firmness to pack color onto the lids for maximum pigmentation.
M158 Angle/Liner Spoolie Brush (Synthetic): This double-ended brush makes the perfect power couple for your fiercest eyes yet.

Most of these brushes have narural bristles, which is something I don't have much experience with. My first impression was that they are not very soft and shed a little bit when I apply too much pressure to them. That was in the beginning, I've used them a couple times and the shedding stopped. I don't feel like it's a big problem, because the brush performance didn't change at all. However, it may scare some people. I also feel like they stain a little easier than my synthetic brushes. I always just rub the brush against my hand and it's ready to go, but these ones keep the pigment in for a lot longer. I will probably need to wash them a little more often.
The price of this set is 30 Euro, which is around 770 Crowns. That makes is around 4 Euro, 100 Crowns per brush, which is a very good price for good quality brushes. I didn't plan in getting the set at first, but after this calculation, I decided that it will probably make my life a little easier in terms of buying new eyeshadow brushes because for this price, it's hard to get good ones.
Overall, I am very happy with the selection of brushes you get. I can create pretty much anything with just these which makes them perfect for travel and the case is just a beautiful bonus. I would totally recommend buying these if you want to try Morphe brushes, but they also have multiple different good value sets, if you don't feel like you need these in particular or you want more of the synthetic ones.
25L LIVE IN COLOR ARTISTRY PALLETE

As you can guess from the name, you get 25 shades in the pallete, total weight is 40g. There are 15 eyeshadows and 10 pressed pigments. All the information about all the shades is on the back of the box including all the ingredients. It lasts for 12 months after opening.
The dimensions are 20cm x 20.5cm so it't not exactly a small pallete, but it's very thin and not bulky. The pallete has a decent mirror that takes up almost the whole pallete lid, I like the space around it because I don't get my fingerprints on it when I want to use it. There are 25 round pans with shade names written bellow them. I prefer this to the plastic sheets with names.

There were beautiful posts in Morphe's Instagram, where they explained name of every single shade in the pallete, so if you want to get deeper in the meanings, go ahead and have a nice read over there.
I feel like it's not too big for travel and honestly, this is my type of a travel pallete. When I go somewhere, I don't like being boring and I have to pack multiple palletes to fulfill that, here I just need one and a few extra helpers like a pot of glitter. I can see myself going on vacation with this pallete in the summer, for sure.

The colors are just beautiful, I don't own a rainbow pallete and I felt like this one has so much to offer. There are increadible bright and bold and metallic shades and every one of them is very unique. You're not being bored by neutral browns and transition shades of warm browns and terracotas...no, this pallete is pure fun and joy for me.

Scrolling through the page, you can see all swatches. I didn't want to make them too tiny to see, I wanted you to see and know the whole deal with how these look. We all know at this point, that swatches don't correspond to how the shadows actually apply and work on the lid. For example the shade TRUTH doesn't swatch well at all, but it applies just fine and it's very pigmented when you apply it with a brush. On the other hand, the metallics just like MAKE MAGIC or ACTIVISM swatch very well, but making them as opaque on the lid is a challenge.

I really wanted to include my own swatches, because sometimes, the colors just don't look the same on the website or Instagram, as they do in real life. I was surprised by many of them when my pallete arrived. For example, the shade PRIDE just blew my mind. It's such a unique and beautiful stunning vivid, almost neon, orange. I've never had a color like this and I never knew I needed it. But boy, I wear this shade all the time these days.
At this point, I've been using this pallete for about two weeks and I cannot get enough. There are so many ideas and combinations and inspiration coming to my head with this pallete. I feel like it's making me move forward in my eyeshadow game a bit and I haven't had that feeling in a while.


With some shades, I experienced a little kickback, but sometimes I get a little violent with my brushes, so that could be my fault as well. However, the shades are absolutelly not powdery. They feel very nice and creamy, the pigment just is there and I've been using them with not only Morphe brushes and they all worked well so far.
The metallics are a little tricky. The finger works the best in my opinion, even though I don't like using it. Wet brush is OK too, but I am always afraid of ruining the pan. So you have to be a little thoughtful when applying these, but I feel like that's common with most metallic eyeshadows. When you figure it out, they are incredible.
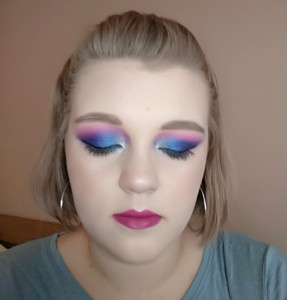
I didn't want to just talk about the pallete so I decided to include some looks I did with it. I like a good rainbow, but it's a bit more exciting for me to just make a colorful and bright look that I like and that is unusual for me than doing the good 'ol rainbow cutcrease thing. So here are some looks, I created with this beauty. Also I included which shades I used and which other products helped me come up with these full eyeshadow looks.

Look 1
Used shades
SF
HARMONY
PEACE
MILK
With the help of...
Essence Molten Chrome eyeshadow, shade 05 lead me
Physician's Formula Eye Booster, shade Ultra Black
H&M Best Curlfriend Mascara, shade Deep Black
Maybelline Tattoo Liner, shade 900 Deep Onyx
NYX Jumbo Eye Pencil, shade Peacock


I used a big fluffy blending brush to place #LOVEWINS in and above my crease, then I used more tapered smaller blending brush to place SF into outter half of my crease. Then I started placing my shimmers with dense flat brushes, first HARMONY to the outter edge of my lid, then PEACE in the middle part and then the Essence Molten Chrome eyeshadow to the inner third of my lid. To define the blown out shade, I use MILK to clean up the edges and blend them well. Then, I put black gel pencil liner in the outer third of my waterline and the NYX Jumbo Eye Pencil to the rest of my waterline. Add a nice black winged liner and mascara, and you're done!
Look 2
Used shades
PRIDE
LIFE
GILBERT
LIBERATION
With the help of...
Too Faced glitterPOP! Peel-off Eyeliner, shade Yes Way Rosé
NYX Worth The Hype Mascara, shade Black

Once I tried using only the Pride collection Morphe brush set. I used the M513 to lay down the PRIDE shade in and above my crease and create the shape. Then I went in with M507 to deepen the crease with LIFE. I took GILBERT on M326 and placed it on the outer half of my lid area to create a winged shape. Then I went in with M167 to pack LIBERATION on the inner half of my lid. I added some mascara and placed a little bit of the Two Faced rose gold glitter liner to my inner corners to create a face inner corner from glitter.
Look 3
Used shades
SUNSHINE
PRIDE
SUNBEAM
With the help of...
H&M Best Curlfriend Mascara, shade Deep Black
Physician's Formula Eye Booster, shade Ultra Black
This look was one of these you make, when you wake up too late, you need to get ready in like 15 minutes and you don't have much time to fuzz around. This type of a look is something that I do when there's not time to spare.
First I took a big fluffy brush and placed SUNSHINE all over the eye area pretty much. When it was blended enough, I took PRIDE on a dense flat brush and packed it all over my lid and slightly above, because I have hooded eyes and I like to go a little higher than most people go with their shadows. Then I took the other side of the flat brush, picked up SUNBEAM, sprayed it a bit with a random setting spray and packed it all over the PRIDE shade.


Look 4
Used shades
ART
PARADE
NYC
With the help of...
Jeffree Star Cosmetics Blue Blood Pallete, shade Crystal Flesh
Lottie London eye foil, shade denied
This was one of the more precise looks I did. It was actually for a graduation party of my friends, who just finished their master degrees. So yeah, me now having one yet meant having at least coolest makeup.
I started with Morphe M513 to lay down ART in and above my crease (as usual), then I continued with parade on several smaller brushes to get that nice shape I wanted. This stage takes a lot of blending and going back and forward between brushes, so you just need patience. After I got that shape, I deepend it more with NYC. I followed the crease shape with a small pointed brush. Then I started packing a little bit of parade on the outer edge of the lid. I wanted to incorporate more light tones in the look, so I took Crystal Flesh from Blue Blood pallete and packed that pretty much on the majority of my lid, starting in the inner portion and working outwards. After that, I took the eye foil by Lottie London and placed a tun of glitter on the separating line between the teal and the glittery fleshy color. That added a nice sparkle to the look. I added a winged liner, mascara and black gel pencil to the waterline. I also smoked out the lower lash line with the shade PARADE and blended it out with a bit of ART. At the end, I added the eye foil to the middle of my lower lashline to extend the upper glitter part.


Look 5
Used shades
THRIVE
With the help of...
H&M Special FX Eye Colour Pallete
Fenty Beauty Vivid Liquid Eyeliner, shade Banana Blaze
Lottie London AM TO PM Kohl Eyeliner Pencil, shade Velvet
NYX Worth the Hype Mascara, shade Black
Physician's Formula Eye Booster, shade Ultra Black
For this one I had a little colour fever. I was combining very straight forward colors, not really experimenting that much. So I went in with THRIVE like almost everywhere. It's such a beautiful pear green shade, I've never seen a shade like this. I took a big fluffy brush and went in. After that, on slightly smaller fluffy brush I picked up #LOVEWINS and went in a little bit lower. Mixing these two together created a nice orange transition without using any orange eyeshadow. Color mixing is magic, we all knew it when we were 6. Anyway, to make it nice and smokey, I took a nice purple/magenta metallic shade from the H&M SFX pallete and packed that on the lid. I also used it and a bit of #LOVEWINS to smoke out the lower lashline. After that I did my liner and lashes. It felt a little boring, so I took the new Fenty Beauty Vivid Liquid Eyeliner in Banana Blaze and did a little fun double liner at the front of my black liner. I like layering eyeliners like this. I also added a bit on that yellow liner to my inner corners on a fluffy brush.


Look 6
Used shades
THRIVE
ACTIVISM
With the help of...
Physician's Formula Eye Booster, shade Ultra Black
NYX Worth the Hype Mascara, shade Black
Maybelline Tattoo Liner, shade 900 Deep Onyx
Fenty Beauty Vivid Liquid Eyeliner, shade Banana Blaze
This look is again one of the simple ones. However, I thought that maybe I could incorporate the green shades as well in a nice fresh look. Here I layered the THRIVE shade with multiple brushes to blend it in the crease and deepen it with it as well. I packed ACTIVISM all over the lid with a packing brush and after a while I gave up and did it with a finger. I ran a black liner on my waterline and added a pop of color with the Fenty Beauty yellow liner in the inner lower corner of my eyes. My favourite trick to make the eyes pop even more than just with highlighter. Then I added, as always, a winged liner and a bit of mascara.


Look 7
Used shades
SUNLIGHT
PRIDE
LIFE
STONEWALL
With the help of...
H&M Best Curlfriend Mascara, shade Deep Black
NYX Jumbo Eye Pencil, shade Gold
H&M Fluid Hues Eye Colour, shade Vintage Tulle

This look was also not very complicated. I thought, that it could be nice to include a halo eye, since I do these all the time and really enjoy it. I started with fluffy brush nearly on my brow bone with the shade SUNLIGHT, I continued a bit lower with the same brush and the shade PRIDE. After having a nice more rounded shape, I took a smaller packing brush and placed LIFE on the inner and outer portion of my eyelid. I connected these two around the eyesocket with the shade LIFE again. After having the outline, I took the liquid H&M eyeshadow and placed it in the middle. Blending these is quite hard, but you need to be quick and carefull because liquid shadows can act in many different ways. You can always wait for it to dry and go over it with more eyeshadow to blend it in. After blending it, I took another packing brush with STONEWALL and packed that over the liquid shadow to give it a bit more sparkle and shimmer. I liked the halo so much, that I didn't even add a winged liner.
Final thoughts
It took me some time to make this post, so it's not June anymore and it seems like you can get this collection on some versions of the website or in the Morphe stores. I hope this post was at least an inspiration or a advice in case you wanted to purchase this collection.
Overall, I really love this whole collection, it was nothing less than fun and rewarding experience getting it. The cause is awesome and you can still donate to the Trevor Project when shopping at Morphe website, just add a donation to you cart.
I've done many more looks with this pallete that I didn't even document, so there's still a lot to play with in this pallete, for me.
How do you feel about this collection? Let me know bellow and as always, thanks for reading.
Comments